Thanks to Feedjit, I notice that many of the searches that lead people to my blog consists of the word "Cayston". Since it's a new drug, I thought I would post a non-sponsored, completely my own advice walk-through of how I clean and use Cayston.
It starts off with the cleaning and then moves to the usage. Sorry, it's late, so I posted them backwards. You'll live. Just scroll down if you want to read the usage part first. It's labelled with a big, fat title.
Disclaimer: This is information I have either gotten from the CFF website, from the information sent to me with Cayston, or my own variations. It is not official medical advice, just something I thought might help people who were as lost as I was when I first started Cayston.
Mom's Disclaimer: Sorry if you see any sort of messiness or clutter. Pretend you didn't see it and move on. Thanks!
CLEANING!!!!
 First, you need to get some dishwashing detergent that is *NOT* antibacterial!
 For cleaning, this is the setting and the actors: dirty Cayston pieces, the detergent, and the Ziplock containers they sent with the Cayston stuff for the first time.
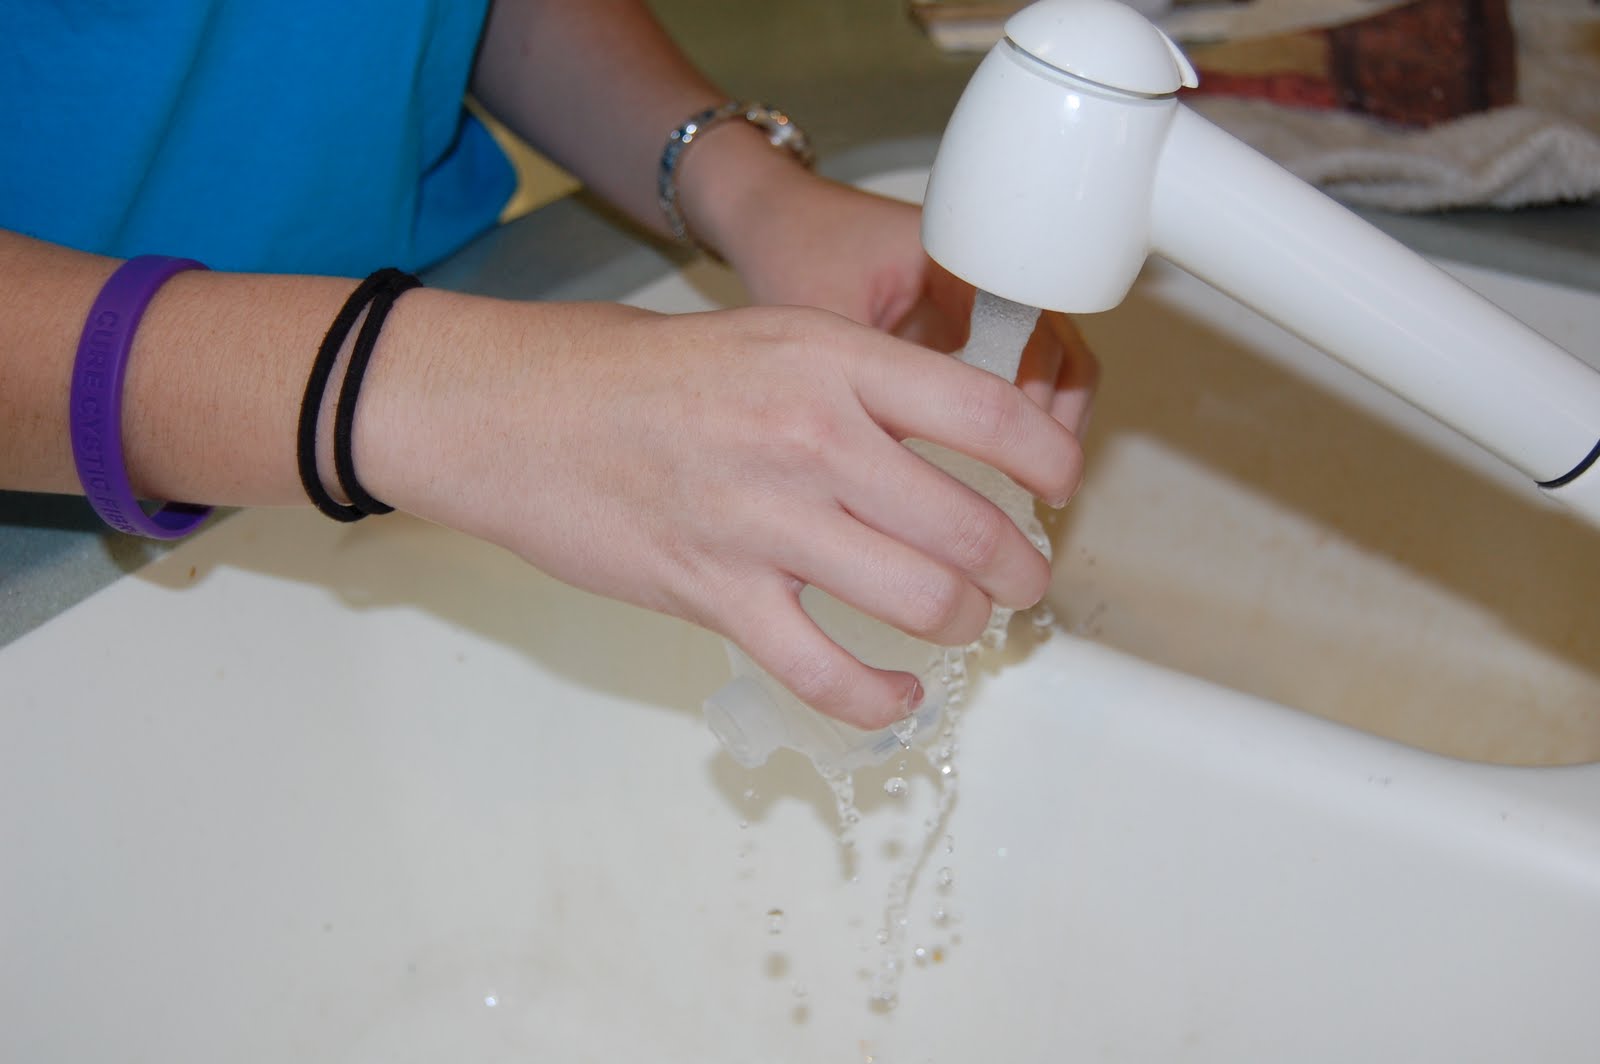 With warm/hot water, we rinse out all of the non-metal Cayston pieces...
 ....and place them in the Ziplock container, which is filled with detergent and warm water.
 I usually separate the grey piece to make sure I get it all washed out. (WARNING- if you have a sink with two halves, use the side without the open drain! If not, cover it up... you don't want those pieces falling in!)
 Rinse....
 ...and drop in the same container as the body.
 Rinse both the blue rubber piece...
 .... and the mouthpiece thoroughly, getting all of the openings too.
 And in they go with the other plastic pieces.
 Close the lid.... (but don't turn it all the way, because it's really hard to get back off)
 ...and shake it up!! Warning, water will go everywhere.
 Rinse the head in a slower stream of warm water... both sides. (Note: this is also done immediately after finishing a Cayston dose)
 Open the container with the plastic/rubber pieces and rinse them off individually with the warm/hot water. Set out to dry (see later picture)
  This is how I set them out to dry. They don't stay here but more than a minute while I set up the sterilizer (aka Nuk baby bottle cleaner that they sent with the first Cayston dose)
 Since I also washed the containers while washing the pieces, I set them out to dry. (For each paper towel piece you see, there is a second one under it, giving it a double-layer)
 In the front of the baby bottle cleaner, there is a measuring cup. It took me WAAY too long to find it on my own, sadly.

 And pour it in the metal pan
 Here is the gut of the baby bottle cleaner.
 This is where the main piece will hang, using the hinge of the piece. It will only fit 3.
 Here's the top rack of the baby bottle cleaner. This is where everything else goes. I have mastered fitting in 3 Cayston sets in here without anything overlapping. Observe:
 First goes in the head, which cannot lie flat. However, they fit perfectly around the legs of the middle knob.
 Like such.
 Next comes the assembled top piece, which fits between each head, making three points on a triangle.
 The rubbed blue pieces, which I lay "face" down, will cozy up to the grey tops nicely.
 And that leaves plenty of room for the mouth pieces. Perfection!
 So now we put the gut of the baby bottle cleaner back on the metal pan
 The rack on top of that
 And then the lid!
 Now, we have the one solitary button on this machine. What to do?
 We push it down of course! Oh look, a light comes on! It will run a few minutes (the book says 8 I think, but it never seems that long to me) and you might hear a quiet "pop" noise. That's it for an alarm. However, you don't want to open it immediately after it's done, since it will be super hot and steamy (like me... juuuust kidding). So give it a few more minutes and take the lid off. It will be covered in condensation. I turn it upside-down, hit the knob on the counter to gather the water, and dump it in the sink. Problem solved.
 This is how I lay them all out. Notice I open the grey pieces because the white part retains water. The blue rubber part doesn't air out well, so I prop it up on the mouth pieces and it does much better. Can you tell I'm an engineer's daughter?
 I also prop the lid up so that it can finish drying too.
 A little while later, after everything dried, it's time to do a dose!!! This is the glass bottle and plastic ampule that will be used. They are kinda cute.
 First, we need to assemble the pieces. Take the large plastic one and open it.
 The head goes in that funny looking side as such. It kinda snaps in.
 The blue piece goes in opposite the head.
 Close it!
 Attach the mouth piece
 This is where it connects to the power source/machine. It has a hinge and GENTLY snap it on. Mine is already broken in two places, but still works just fine.
 This is the almost ready Cayston piece
 The machine
 The battery compartment is in the grey area. But if you don't want to use batteries...
 This is where the hole is for the other end of the wall adapter. It comes with the Cayston stuff as well.
 This end is for the hook up of the grey piece we already attached to the mouth piece a few pictures back.
 We need that cute glass bottle again! Take the aluminum tab, pull down, and start pulling around to get it completely off. It breaks occasionally and can be a pain, but it needs to come completely off.
 It will look like this!
 Empty the ampule into the glass bottle, put the grey stopper back on, and SHAKE! It needs to be clear to inhale properly.
 Pour it into the top of the mouth piece. It will only be about this much.
 Put the grey piece on and turn to make sure it is closed.
 Press the solitary button and hold for a few seconds. It will beep...
 ....and this screen will appear after the PARI screen. This means Cayston is going!
 No talking! It's very short so if you need to take it out of your mouth, press the lonely button and hold to stop the treatment. It won't be happy with you, but it works. Like that I'm in the kitchen still?
 It will beep 2 times and show you this screen when it's done. (Sorry it's hard to see) It lasts around 1 1/2 - 2 minutes. My piece will sometimes "click" a few times right before it's done, but I'm not sure if that's everyone, but if you hear that noise, don't panic!
 GENTLY pull downward on the grey back connection to release it.


8 comments:
Very good post and thanks for the link for the awareness bands! This is a most excellent, lengthy instructional post. Good job!
I do have a couple of small corrections to the technique according to a physician study - http://www.cffatboy.com/site/wp-content/uploads/2010/04/Guidance_on_eFlowApril6_2010.pdf and what my CF doctors have put in place for their patients for extra safety:
They say the head does not get put in a bowl with soap because soap residue will clog the holes. I know in the past, Foundation Care said to do that and store the head in alcohol until next use, but the study specifies to not use bleach, alcohol, hydrogen peroxide, or boiling on the head or any part. The bottle cleaner is the way to go.
My CF center took these instructions one ste further and said they "do not want anyone using tap water to clean their nebulizers. You are at an increased risk for colonizing with achromobacter, atypical mycobacteriums, and other organisms. Please use sterile water!" That was enough of a reason for me to use sterile water and the bottle cleaner.
Your cleaning method compared to mine puts you on some level of sainthood. Well done!!
Ronnie
I like the no talking rule. Jesse forgets that sometimes. He will be talking while the medicine is just floating into the air.
Love the CF bracelet too :)
"since it will be super hot and steamy (like me... juuuust kidding)." ahahahaha you're hilarious! I agree with Ronnie, your level of efficiency in cleaning makes me feel like a slacker, but maybe this will inspire me to be more careful with my cleaning!
What a great post! You did a fabulous job walking through it... We don't use this but if we do I will come on back and make sure to read it again.
Awesome post. Will you please come over to my house and clean my nebs? Please?
Did the Nuk specify tap or distilled water? I find distilled works better in sterilizer.
Thanks again for a great post.
Thanks so much for the great directions. I was "dreading" our first time - found your post - and WAH-LA we were done! Thanks for making it easy, effortless and FUN!
Thanks for the great post. I find that shaking the liquid out of the small container seems ineffective. Shaking lets random droplets fly around. Have you found a better way to pour that loses less drug?
Post a Comment